Fitting Bubble Gaskets to Aluminium Windows: Trade Tips and Techniques
Fitting Bubble Gaskets to Aluminium Windows: Trade Tips and Techniques Bubble gasket replacement is a common task for both trade professionals and DIY-mind...
Bubble gasket replacement is a common task for both trade professionals and DIY-minded homeowners who want to restore weatherproofing, reduce noise and improve thermal performance on aluminium windows. This post covers practical techniques, material choices and step-by-step advice for fitting bubble gasket to casement, tilt-and-turn and fixed aluminium frames without compromising hardware or glazing beads.
What a bubble gasket is and where it sits
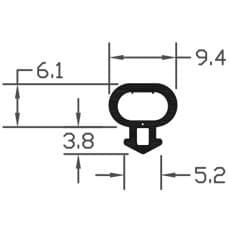
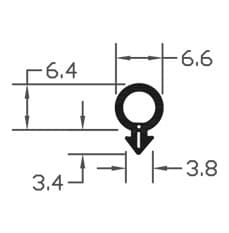
A bubble gasket is a rounded, hollow seal typically made from EPDM, PVC or TPE; it features a bulb that compresses against the sash or fixed frame to form a weather seal. On aluminium windows the gasket usually locates into a dedicated channel or groove on the frame or sash. Correct profile selection is crucial: choose a gasket whose base fits the channel width and whose bulb compresses 20–40% when the window closes for a reliable seal.
Choosing the right material and profile
- EPDM: durable and weather-resistant; best for longevity and UV exposure.
- PVC: cheaper but can harden over time in cold climates; suitable for secondary or internal applications.
- TPE: flexible and recyclable; sits between EPDM and PVC for cost and performance.
- Measure channel width, depth and the bulb diameter: common bulbs are 4mm, 6mm and 8mm; ensure the base section matches the groove profile.
- Order slightly more than required: allow 5–10% for waste and mistakes when cutting and joining.
Tools and materials you will need
- Replacement bubble gasket in the correct profile and material
- Glazing bead removal tool or thin pry bar; flat screwdriver wrapped in cloth for protection
- Gasket insertion tool or plastic wedge; small rubber roller to seat the gasket
- Sharp utility knife and fine-tooth hacksaw if trimming metal stops
- Isopropyl alcohol and a clean cloth for cleaning contact surfaces
- Soapy water or a water-based slip solution; avoid petroleum-based lubricants which can degrade some rubbers
- Heat gun for cold weather work (trade use preferred); adhesive for end stops where necessary
Preparation and removal of the old gasket
Always protect glazing beads and glass. Open the sash fully and remove any glazing beads if the gasket sits behind them; some modern frames allow gasket replacement without removing beads. Use a bead removal tool to avoid damage. When removing the old gasket, do not yank aggressively; work it out gently using a flat tool and scissors to cut through stubborn sections. Clean the channel thoroughly with isopropyl alcohol to remove old adhesive, dirt and residue so the new gasket seats properly.
Fitting technique: step-by-step
Follow these steps for a reliable fit whether you are a trade professional or a competent DIYer:
- Acclimatise the gasket: store coils in a warm space for a few hours before fitting, especially in cold weather. If necessary, warm the gasket slightly with warm water or a heat gun on low to increase flexibility.
- Start at the top centre: push the gasket into the channel at the top centre of the frame. Work outwards to each corner rather than starting at a corner; this reduces stress and stretching at joins.
- Use soapy water: apply a water-based slip solution to the channel and the bulb to ease insertion. Avoid petroleum lubricants.
- Seat the base first: ensure the gasket base is fully engaged in the groove; then roll the bulb into place with a small rubber roller or your thumb. A plastic wedge or insertion tool helps to push the gasket along tight laps without nicking it.
- Corners and joints: for mitred frames you can either mitre the gasket ends at 45 degrees or use a butt joint with a small overlap. For trade work, use a mitre where possible and remove excess with a sharp knife; for DIY, a neat butt joint with a small overlap that’s sealed with suitable adhesive is acceptable.
- Trim and secure: cut the gasket so that the ends meet cleanly. If the gasket will move, use a small dab of compatible adhesive in the channel ends to prevent migration; avoid large quantities which can push the gasket out of profile.
- Refit glazing beads: where removed, carefully press beads back into place, checking that beads do not pinch or deform the gasket.
Trade tips for a professional finish
- Work at room temperature where possible; EPDM becomes rigid in low temperatures and may tear if forced.
- Use a small rubber roller and jaw protectors to compress the gasket without marring aluminium finishes.
- When replacing multiple windows of the same type, prepare lengths cut to rough size to speed up onsite work and reduce waste.
- For high-performance acoustic or smoke-seal applications, confirm the gasket's acoustic rating and compatibility with the hardware; certain bubble gaskets are designed to interact with specific hinges and espagnolette gear.
- Document the profile and source for future replacements; taking photos of the old gasket cross-section helps when ordering spares.
Testing and aftercare
Once fitted, test the seal by closing the window and running a draught check along the perimeter; a lit candle or smoke pen can show leaks. For weather testing, spray the external face with water while observing the interior for ingress. Advise homeowners to avoid painting or applying solvent-based cleaners near the gasket; clean with mild detergent and water. Reapply a silicone-free lubricant annually if necessary to keep the gasket supple.
Common problems and troubleshooting
- Gasket puckering or bubbling: usually caused by overstretching during fitting; remove and refit with less tension.
- Uneven compression: check that the correct bulb diameter was chosen; sometimes a slightly larger or smaller bulb resolves latching and handle torque issues.
- Gasket sliding out of channel: secure the ends with a small amount of compatible adhesive or consider a different base profile that locks into the groove more positively.
- Interference with hardware: ensure the gasket does not foul handles, hinges or keep plates; trim as required and test full operation of the window before leaving the site.
Where to find profiles and further technical help
Bubble gasket profiles are stocked in many lengths and materials by trade suppliers; for more on gaskets and seals see our pillar page: /guides/gaskets-seals. If in doubt about compatibility with specialised aluminium systems, consult the window manufacturer or request a sample before ordering bulk quantities.
Recommended Products
Based on this article, you may find these products helpful:
- B003 Bubble Gasket
- B004 Bubble Gasket
- B007 Bubble Gasket
- ERAB Espagnolette Window Lock Universal Lock Replacement
- Avocet Slimline Offset Window Espag
Conclusion and next steps
Replacing a bubble gasket on aluminium windows is a straightforward task with the right profile, preparation and tools. For DIYers: work slowly, warm the gasket and use soapy water to ease insertion. For trade professionals: plan mitres, use roller tools and document profiles for repeat jobs. Next steps: measure the channel precisely, order a sample profile if unsure, and schedule the work in mild weather where possible to keep the new gasket flexible during fitting.