Why Is My Bubble Gasket Shrinking? Common Causes and Professional Fixes
Why Is My Bubble Gasket Shrinking? Common Causes and Professional Fixes Bubble gasket problems are a common source of draughts, rattles and water ingress o...
Why Is My Bubble Gasket Shrinking? Common Causes and Professional Fixes
Bubble gasket problems are a common source of draughts, rattles and water ingress on windows and doors. Whether you are a homeowner dealing with a cold sash or a trade professional specifying replacements, understanding why a bubble gasket shrinks helps you choose the right repair and avoid repeat failures.
What is a bubble gasket and where it is used
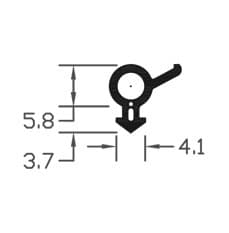
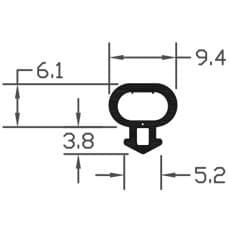
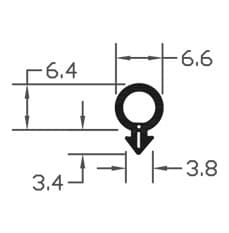
A bubble gasket is a tubular seal, usually extruded from EPDM rubber, TPE or PVC, with a hollow "bubble" profile that compresses to seal sash-to-frame or glass-to-frame interfaces. These gaskets are widely used on casement windows, patio doors and commercial aluminium systems because the bubble profile provides a wide contact area and good acoustic and thermal performance when correctly compressed.
Common causes of bubble gasket shrinkage
- Material selection: PVC and cheaper TPE compounds can shrink more over time compared with high-grade EPDM; the polymer formulation and plasticiser content strongly influence dimensional stability.
- UV and heat exposure: prolonged sunlight and high temperatures cause polymer chains to break down or plasticisers to migrate; the result is loss of elasticity and measurable shrinkage.
- Aging and compression set: repeated compression causes a permanent set; a bubble gasket that has taken a compression set will appear shorter and fail to rebound to its original length.
- Poor storage or handling prior to fitting: exposure to heat, cold or solvents in transit can change profile dimensions before installation.
- Incorrect profile or groove size: fitting an oversize bubble into a shallow groove can pull the gasket along the frame when it relaxes; incorrect fitment looks like shrinkage but is actually migration or roll-out.
- Chemical attack: paints, solvent-based cleaners and some silicones degrade rubber compounds; attacked areas shrink, crack or become sticky.
How to diagnose a shrinking bubble gasket
Start by checking visible signs: gaps at frame corners, exposed metal, or the gasket appearing loose in the rebate. Measure the gasket length when removed and compare with the original groove perimeter; even a small percentage of shrinkage produces noticeable gaps. Check for surface changes: a powdery, cracked or tacky finish indicates degradation. Also inspect the frame channel for old adhesive, paint or sealant that might be preventing the gasket from seating properly.
DIY fixes for minor shrinkage
Small shrinkage problems can sometimes be resolved without replacing the entire seal. Practical DIY options include:
- Re-seating the gasket: carefully remove the bead or sash, lubricate the gasket with a smear of washing-up liquid or specialist rubber lubricant, and roll or press it back into the channel; this can remove kinks and allow the gasket to sit correctly.
- Edge packing: for small gaps at corners, a narrow foam or rubber packer can be glued behind the gasket to restore compression; use an adhesive compatible with the gasket material.
- Temporary softening: gentle warming with warm water can make EPDM pliable enough to re-seat; do not use high heat or concentrated hot-air, as this will accelerate degradation.
- Sealant repair: for very small gaps causing draughts, a thin bead of neutral-cure silicone can be used as a temporary measure; avoid solvent-based sealants which attack rubber.
When replacement is the correct solution
If the gasket shows hardening, cracking, extensive compression set or widespread shrinkage, replacement is the only long-term fix. Replacement also makes sense when the original material type was unsuitable for the application: for example, PVC used in a high-UV situation will likely re-fail. Choose the correct profile, size and compound: EPDM is generally the best all-round choice for windows because of its UV and ozone resistance; TPEs are acceptable for some doors but check manufacturer data on shrinkage.
Professional fixes and best practice for trades
- Strip and clean: professionals remove glazing beads and old gasket, clean the channel thoroughly and use suitable solvents to remove adhesive residues; this ensures a true seating surface for the new gasket.
- Specify the right compound and durometer: request technical data from suppliers; a typical window gasket durometer is 40 to 60 Shore A, but check the system manufacturer’s recommendation.
- Use correct fitting technique: use a mild lubricant, fit from corner to corner, and avoid stretching the gasket lengthways; butt joints or mitred corners should be made according to the gasket type and sealed with vinyl adhesive if needed.
- Quality control: after fitting, check for even compression around the frame; measure compression set and perform a water and draught test where appropriate.
- Consider retrofit solutions: in cases of minor shrinkage on aluminium frames, a specialist gasket extender or a new cover seal may be fitted without removing the glass unit; this reduces labour and avoids disturbing sealed units.
Prevention and ongoing care
Correct material selection, keeping stock out of direct sunlight and avoiding contact with solvents will prolong gasket life. Regular maintenance includes cleaning with mild soap and water and using rubber protectants compatible with EPDM. Avoid painting over gaskets or using silicone sealants that cure with acetic acid; those products can cause long-term shrinkage and failure.
Useful resources and next steps
For specification details and profile options see our trade guide at /guides/gaskets-seals. If you are unsure about material selection or whether a DIY fix is suitable, contact a local window specialist. For replacement jobs, get quotes that include removal, disposal and testing for water and draughts so the repair is comprehensive.
Conclusion: Bubble gasket shrinkage usually results from material degradation, heat or incorrect fit; minor issues can be remedied by re-seating or packing, but widespread shrinkage requires full replacement with the correct compound and fitting technique. If you are a homeowner wanting to attempt a repair, follow the DIY steps above and use compatible adhesives and lubricants; if the problem is extensive or involves sealed units and complex aluminium systems, engage a trade professional for a lasting fix.
Recommended Products
Based on this article, you may find these products helpful: