Letterbox Draught Excluder: How to Stop Cold Air Coming Through
Letterbox Draught Excluder: How to Stop Cold Air Coming Through A cold draught through a letterbox is one of the most common causes of heat loss and discom...
Letterbox Draught Excluder: How to Stop Cold Air Coming Through
A cold draught through a letterbox is one of the most common causes of heat loss and discomfort at the front of a house. For homeowners and trade professionals, fitting an effective letterbox draught excluder is a simple, cost-effective way to reduce heat loss, improve comfort and prevent dust and insects entering the property. This article explains the types of draught excluders available, technical considerations for doors and fire-rated assemblies, and step-by-step installation and maintenance guidance.
Why letterbox draught excluders matter
Letterboxes create a direct airflow path between the outside and the hallway; even a small gap can let in significant cold air and noise. A purpose-designed letterbox draught excluder reduces convective heat loss, improves thermal comfort and can reduce heating bills. For tradespeople, fitting the right product also avoids repeated call-backs and ensures compliance where fire doors are involved.
Types of letterbox draught excluders
- Brush or bristle strips: A row of dense nylon brushes fitted to the inner face of the letterplate; they allow mail to pass but block air movement.
- Rubber or foam seals: Compressed rubber or closed-cell foam around the flap perimeter to create an airtight seal when closed.
- Magnetic seals: Small magnets within the flap or frame to provide a firm closing seal; commonly used on internal letterplates.
- Draft-cushion letterplates: Combined external and internal plates with insulating foam and a soft seal; often better for thermal performance but need correct sizing.
- Letterbox cowl or anti-fishing cage: Adds security and reduces draughts by redirecting airflow; best used with an internal seal.
Technical considerations before you buy
Choose a draught excluder that is compatible with the door and letterbox type. Consider the following:
- Door material: Hardwood, softwood, uPVC and composite doors have different fixing methods and screw requirements. Use stainless steel screws for external doors near the coast.
- Fire doors: Many internal flat entrance doors are fire-rated; altering them can void certification. Use only fire-rated letterplates and intumescent seals on fire doors; consult the manufacturer or a fire door specialist.
- Thickness and fit: Measure the letterbox aperture and door thickness accurately; some retrofit seals compress differently and can obstruct the flap if too thick.
- Security: If insurance or building rules require anti-fishing protection, select a combined solution: robust internal brush plus security cage.
- Weather exposure: External letterplates need corrosion-resistant finishes and UV-stable sealing materials.
Tools and materials for a typical retrofit
- New letterplate with draught seal or internal brush kit
- Pencil, tape measure and square
- Screwdriver set or drill with appropriate bits
- Stainless steel screws (if replacing external plate)
- Silicone sealant or suitable mastic for external joints
- Small foam strip or closed-cell gasket for fine tuning
- Personal protective equipment: gloves and eye protection
Step-by-step installation (internal brush letterplate example)
- Measure: From inside the property measure the height and width of the letter aperture and note door thickness. Confirm the new plate matches those dimensions.
- Remove existing plate: Unscrew the internal and external plates and keep the screws if they are corrosion-free; discard damaged plates.
- Clean the aperture: Remove dust and old sealant; ensure edges are smooth. If the aperture has rot or degraded timber, repair before fitting the new plate.
- Fit the internal draught excluder: Position the inner plate with the brush or rubber seal facing the interior. For brush strips ensure bristles hang clear of the flap movement.
- Fit the external plate: Align the external flap; start screws hand-tight to ensure correct alignment; then tighten evenly so the flap sits flush without binding.
- Seal externally: Apply a thin bead of exterior-grade silicone around the external plate perimeter to prevent water ingress. Avoid sealing the flap hinge or brush area.
- Test: Open and close the flap several times to check free movement and that the brush compresses to form a seal. Adjust with thin foam gaskets if needed.
Trade tips and common pitfalls
- Never force a seal: Excessive compression will damage the flap and cause quick wear; use thinner seal alternatives where clearance is tight.
- Match fixings to substrate: Use wood screws for timber doors, self-tapping or coach screws for composites when specified by the door manufacturer.
- Protect fire door certification: If the door is labelled as fire-rated, only use certified letterplates and intumescent seals. Record and return any removed certification label to the client if required.
- Cut brush lengths accurately: If trimming brush strips, cut between bristle clusters rather than through them to avoid fraying.
- Check for draughts after fitting: Use a smoke pencil or candle to detect small leaks; seal only where appropriate to avoid trapping moisture in timber.
Maintenance and longevity
Letterbox draught excluders are low maintenance but need periodic checks. Inspect brushes and rubber seals annually; replace if bristles are flattened or rubber shows cracking. Clean brushes with a damp cloth and remove trapped debris; avoid solvents that degrade rubber. Re-seal external plates after a few years if the silicone bead shows deterioration.
When to call a professional
Call a qualified joiner or door hardware specialist when:
- The door is fire-rated or part of a communal escape route
- There is rot or structural damage around the aperture
- The letterbox requires modification to a composite or steel door
- Security requirements demand an anti-fishing cage or specialist fixings
Recommended Products
Based on this article, you may find these products helpful:
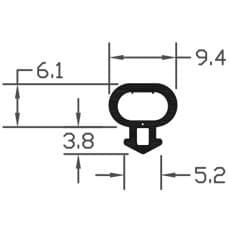
- E-Type Gasket - Black 5m Roll
- E-Type Gasket - Black (Per Metre)
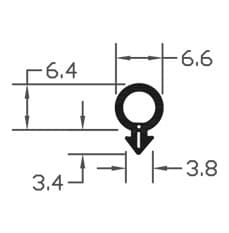
- B003 Bubble Gasket
- B004 Bubble Gasket
- B007 Bubble Gasket
Conclusion and next steps
Fitting a letterbox draught excluder is an effective way to reduce cold air ingress, improve comfort and enhance security when the correct product is chosen and installed. For simple retrofits, internal brush strips or foam seals will usually suffice; for fire doors, composite doors or high-security situations, use certified products and consider professional installation.
Next steps: check whether the door is fire-rated; measure your letter aperture; visit our pillar page at /guides/letterboxes for product recommendations and technical datasheets; or contact the Window Hardware Store trade team for advice and trade pricing.
Products mentioned in this article

Related articles
Internal vs External Letterbox Draught Excluders: Which Works Better?
Internal vs External Letterbox Draught Excluders: Which Works Better? A letterbox is a small opening that can let in a disproportionate amount of cold air,...
How to Retrofit an Anti Arson Letterbox to an Existing Door
How to Retrofit an Anti Arson Letterbox to an Existing Door What is an anti arson letterbox and why retrofit one? An anti arson letterbox is a specialist l...
Letterbox Draught Excluder for Security: Added Protection
Letterbox Draught Excluder for Security: Added Protection A well-chosen letterbox draught excluder reduces heat loss and noise while contributing to a stro...