5 Signs Your Bubble Gasket Needs Replacing Before Winter
5 Signs Your Bubble Gasket Needs Replacing Before Winter A bubble gasket plays a key role in keeping windows and doors weatherproof, draught-free and therm...
5 Signs Your Bubble Gasket Needs Replacing Before Winter
A bubble gasket plays a key role in keeping windows and doors weatherproof, draught-free and thermally efficient. As autumn turns colder and wetter in the UK, worn or damaged bubble gaskets are often the unseen cause of heat loss, damp and noisy rooms. Identifying problems early and replacing faulty seals before winter arrives will keep properties comfortable and costs down; it will also avoid water ingress that can damage frames and finishes.
Five clear signs to look for
-
Visible cracking, splitting or hardening:
Rub the bubble gently with a fingertip: if the rubber flakes, has hairline cracks or feels hard and inflexible, the material has degraded. Most bubble gasket materials used on windows and doors are EPDM, TPE or silicone; EPDM tends to harden and crack with long-term UV and ozone exposure. Any visible damage is a reliable indicator the seal will fail under wind and rain.
-
Permanent compression set: the bubble won’t spring back:
Press the bubble between finger and thumb then release. A good bubble gasket recovers its shape quickly. If the bubble remains squashed or shows a flat spot, the gasket has taken a permanent compression set and will no longer form an effective air or water seal; replacement is recommended before cold weather worsens the issue.
-
Draughts, cold spots or higher heating bills:
Noticeable cold spots near the frame, or increased room draughts, point to an air leakage path. You can confirm this with a simple tissue or candle test: hold a tissue near the sash-edge with the window closed; if it flutters, the seal is compromised. Persistent heat loss is an important practical sign to act on ahead of winter.
-
Water ingress or staining after rain:
Pooling water on sills, damp staining around frames or wet carpet edges after heavy rain indicates the bubble gasket is no longer shedding water. A leaking gasket can allow wind-driven rain into the frame cavity or sill; left unaddressed, this can promote timber rot or damage plaster and decorations.
-
Difficulty closing, misalignment or rattling:
If a sash or door catches, requires extra force to close, or vibrates and rattles in windy conditions, the bubble gasket may have collapsed or shifted. Rattles often mean the gasket no longer holds the sash tightly in the frame; this affects security and acoustic performance as well as thermal efficiency.
Quick diagnostic checks you can do
- Light test at dusk: with lights on inside and a torch or phone light outside, look along the frame for light leaks; they show gaps in the seal.
- Tissue or candle test: detect draughts around joints and meeting stiles.
- Water hose test: gently run a hose over the frame while someone looks inside for leaks; avoid high-pressure jets that aren’t realistic for wind-driven rain conditions.
- Feel and flex test: press along the gasket to check recovery; measure compression set visually—any flat area is suspect.
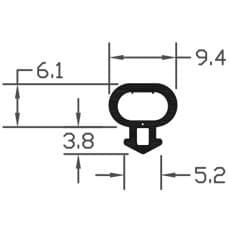
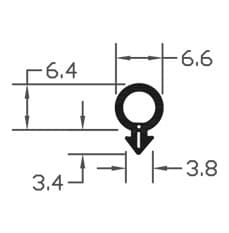
- Measure the channel and profile: note the channel width and bulb diameter to help match replacement parts; take a clear photo for ordering.
Replacement options and practical DIY guidance
Bubble gaskets are available in a range of profiles and materials. EPDM is common for standard windows and doors; TPE and silicone are used where greater flexibility or chemical resistance is needed. For trade professionals, codes and profile numbers matter; for DIYers, bring a sample or photo when ordering.
Basic DIY replacement steps:
-
Prepare the frame:
Remove the old gasket carefully using a gasket removal tool or a small flat screwdriver. Avoid damaging the frame channel. Clean the channel with isopropyl alcohol and a cloth to remove adhesive and dirt; allow to dry.
-
Check the replacement profile:
Dry-fit the new bubble gasket to ensure the bulb sits correctly and the fin or base matches the channel. For push-in gaskets you should feel it click into place; clip-in profiles will need the correct retaining legs.
-
Use the right lubricant and adhesive:
Apply a little soapy water or specialist extrusion lubricant to help push-in gaskets. For butt joints at corners or ends use a compatible gasket adhesive; avoid petroleum solvents which can degrade rubber. Use masking tape to hold ends in place while adhesive cures.
-
Install with correct compression:
Aim for a slight compression of the bubble when the sash is closed, typically 10 to 20 per cent; too little and sealing is poor, too much and the gasket will wear quickly. If the gasket is hard to seat in cold weather, warm it with warm water or a hairdryer to improve pliability.
-
Finish and test:
Trim excess neatly; use a seam roller for a smooth finish if needed. Test for draughts and leaks again once everything is in place.
When to call a trade professional
Simple sash and casement bubble gasket replacements are well within a competent DIYer’s capability. However contact a professional if any of the following apply: complex aluminium systems such as bifold or sliding wall seals; hidden glazing beads that require frame removal; failing sealed units where glass fogging is present; significant frame distortion or rot; or when compliance with building regulations is required for listed buildings.
Recommended Products
Based on this article, you may find these products helpful:
- B003 Bubble Gasket
- B004 Bubble Gasket
- B007 Bubble Gasket
- E-Type Gasket - Black 5m Roll
- E-Type Gasket - Black (Per Metre)
Conclusion and next steps
Bubble gasket failure is a common, avoidable cause of winter draughts and water ingress. Check for cracking, permanent flattening, draughts, leaks and rattles now; simple tests will confirm whether a replacement is needed. For sourcing the correct profile, see our pillar page for gaskets and seals: /guides/gaskets-seals. If you are unsure about profile matching or the system is complex, contact a trade specialist for advice or a site visit. Replacing worn bubble gaskets before the cold weather sets in will protect comfort, reduce energy bills and prevent more costly repairs later.