Understanding Bubble Gasket Dimensions: A Trade Professional's Reference
Understanding Bubble Gasket Dimensions: A Trade Professional's Reference Bubble gasket selection and installation are routine tasks for window and door ins...
Understanding Bubble Gasket Dimensions: A Trade Professional's Reference
Bubble gasket selection and installation are routine tasks for window and door installers, yet getting the dimensions and material right is crucial for long-term performance. This post explains the key measurements, practical trade advice and DIY guidance to help both professionals and homeowners choose, measure and fit bubble gasket correctly. For a broader overview of gaskets and seals see our pillar page: /guides/gaskets-seals.
What is a bubble gasket and where it is used
A bubble gasket is an extruded weatherseal with a rounded, hollow bulb profile mounted on an insertion leg or flange. It is commonly used around the perimeter of windows, patio doors and some external doors to provide weatherproofing, draughtproofing and acoustic sealing. Typical applications include aluminium and uPVC casement windows, sliding doors and composite door leaves where a compressible bulb needs to bridge a variable gap.
Key dimensions and why they matter
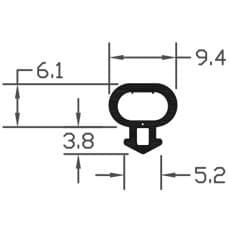
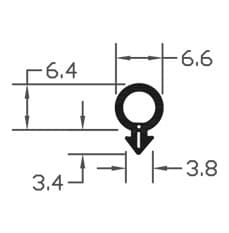
When specifying a bubble gasket, the most important dimensions are the bulb diameter, insertion leg width and thickness, overall height and the socket or groove fit. Each dimension affects the seal, ease of installation and interaction with hardware:
- Bulb diameter: the size of the rounded section that compresses to form the seal. Common diameters are between 6mm and 16mm; larger bulbs provide greater compression range and acoustic performance.
- Insertion leg width and thickness: determines whether the gasket will sit securely in the frame groove. Legs are typically 2mm to 8mm wide but must match the groove dimensions closely for retention.
- Overall height: distance from the base of the insertion leg to the bulb apex. This must exceed the maximum gap to be sealed, while allowing the bulb to compress sufficiently when closed.
- Channel or groove size: the internal width and depth of the frame groove where the leg sits; mismatches cause poor retention or deformation.
- Compression percentage: how much the bulb will be compressed in service. A rule of thumb is aiming for 25% to 40% compression for effective sealing while keeping operating forces acceptable.
How to measure for replacement: practical steps
Accurate measurement stops wasted time and rejected parts. Carry these tools on site: a pair of calipers, a metric tape measure, feeler gauges and a small mirror for difficult corners. Follow this step-by-step method:
- Measure the existing bulb diameter with calipers at the widest point.
- Measure the insertion leg width and thickness; if the gasket is worn, measure the groove width directly instead.
- Measure the overall height from the face of the frame to the outermost point of the bulb when the sash is closed; this helps confirm required bulb height and compression.
- Check groove depth and any retaining lips or beads that may limit leg insertion depth.
- Note the closing geometry: variable gaps along the perimeter such as sill areas or meeting rails; measure the largest gap to size the bulb appropriately.
Selecting the right material and profile
Materials affect longevity, UV resistance and friction. Common materials are soft PVC and thermoplastic rubber (TPV or TPE). Choose according to application:
- PVC: cost-effective and easy to extrude; suitable for internal or sheltered locations. Choose UV-stabilised PVC for exposed positions to avoid embrittlement and discolouration.
- TPV/TPE: improved elasticity, better cold weather performance and lower compression set; preferred on external doors and high-use items.
- Hardness (Shore A): softer compounds give better conformity but may wear faster; typical ranges for window seals are 50–70 Shore A depending on the required feel and compression.
Also consider colour matching and whether the gasket needs fire retardant properties; speak to suppliers for datasheets and compatibility with multi-point locking where travel and seal compression change with the lock.
Fitting tips for tradespeople and DIYers
Good installation preserves seal life and ensures consistent performance. Use these trade-proven techniques:
- Prepare the channel: remove old gasket, clean out debris and dry the groove. A degreasing wipe can help adhesion where adhesive is used.
- Trial-fit the gasket along the length before trimming; ensure it is not twisted and the bulb faces the correct way.
- Lubrication: use a silicone-based or non-petroleum lubricant sparingly to ease insertion; avoid petroleum products that can degrade some PVC compounds.
- Fixing: for push-in legs, apply even pressure along the length with a soft mallet or gasket roller. For adhesive-backed profiles or where specified, use a suitable contact adhesive compatible with the material.
- Trim and seal end joints: cut square and use clear adhesive or joiners recommended by the manufacturer to avoid gaps and leaks.
- Test operation: close the window or door and check for smooth operation and uniform compression; adjust strike plates if the seal impedes locking.
Common mistakes and troubleshooting
Avoid these frequent issues encountered by both pros and DIYers:
- Undersized bulb: results in poor weatherproofing and draughts. If in doubt size up to allow sufficient compression.
- Oversized bulb: causes excessive closing force and wear on hardware; may stop multi-point locks fully engaging.
- Poor groove match: if the leg is too thin, the gasket can pop out; too thick and it will be impossible to insert without damaging the frame.
- Wrong material for exposure: non-UV stabilised materials on external frames will crack and discolour quickly.
- Incorrect compression: check that compression is even around the perimeter; adjust keepers and strike plates if needed.
Practical trade advice for stocking and specifying
For installers and fabricators: stock a small range of popular bulb diameters and insertion leg sizes to cover the majority of replacements. Keep sample strips to match on-site, and maintain links with suppliers who provide technical datasheets and cut-to-length services. When specifying for projects, note the required compression percentage, sash closing geometry and any regulatory requirements for fire or acoustic performance.
Recommended Products
Based on this article, you may find these products helpful:
- B003 Bubble Gasket
- B004 Bubble Gasket
- B007 Bubble Gasket
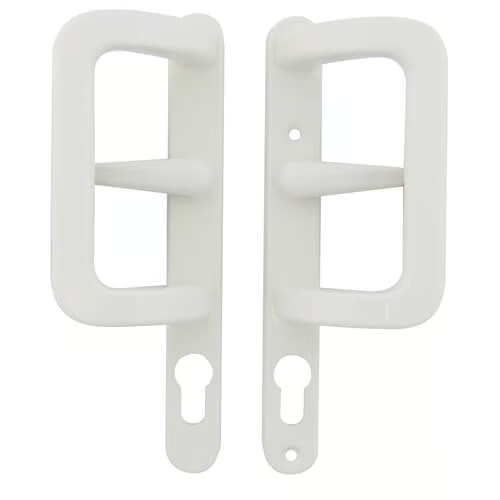
- Patio Door Handle Set - 92PZ White
- Winlock Patio Door Handle Set
Conclusion and next steps
Understanding bubble gasket dimensions removes guesswork and reduces callbacks. Measure accurately, choose the right material and profile for the exposure and fit carefully to ensure durable weather and acoustic performance. Next steps: measure the existing gasket or groove using calipers, consult product datasheets for compression and material properties, and order sample lengths before full installation. If you need further technical help or product options, visit our pillar page /guides/gaskets-seals or contact our trade support team for specific recommendations.