Bubble Gasket Replacement: When to DIY and When to Call a Fitter
Bubble gasket replacement is a common maintenance task for windows and doors that suffer from draughts, rattles or water ingress. A bubble gasket is a holl...
Bubble gasket replacement is a common maintenance task for windows and doors that suffer from draughts, rattles or water ingress. A bubble gasket is a hollow, bulb-shaped seal, typically made from EPDM rubber or thermoplastic elastomer, that compresses between moving frames to form a weatherproof barrier. Knowing when to tackle replacement yourself and when to call a fitter will save time, avoid damage to glazing or hardware, and ensure the correct product and technique are used.
What a bubble gasket does and where you find it
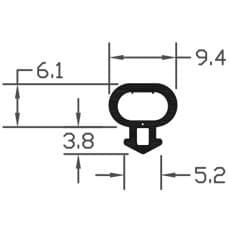
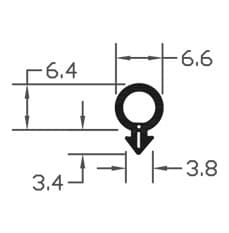
Bubble gaskets are used on casement windows, sliding doors, lift and slide doors, and some conservatory roofs; they are common on aluminium and PVC-U frames. The hollow design allows good compression and recovery, which reduces air leakage and noise. They are available as push-in, clip-in or adhesive-backed profiles and are sized in millimetres to match frame grooves or surface channels. For best weatherproofing, the gasket must match the profile of the frame and the compression required by the locking hardware.
Signs you need a replacement
- Visible cracks, splits or hardening of the rubber.
- Permanent compression or flattening so the seal no longer springs back.
- Water ingress during heavy rain, or persistent draughts.
- Noise transmission or rattles from wind pressure.
- Difficulty operating sash or sliding panels where the seal deforms and binds.
- Ageing that coincides with frequent condensation between sealed glass units: a failed gasket can indicate other issues.
DIY: When it is sensible to replace yourself
Homeowners with reasonable DIY skills can replace bubble gaskets on many PVC-U and timber windows where the gasket is surface-fitted or pushes into an accessible groove. Choose this option when:
- The gasket sits in an exposed channel and is not mechanically fixed into the frame.
- You can remove the sash or sliding panel without dismantling glazing or breaching sealed double-glazed units.
- The job requires simple cutting to length and push-fit installation, or adhesive-backed profiles.
- The window or door is not fire-rated; altering seals on fire doors can compromise performance and certification.
DIY step-by-step: practical trade advice
- Tools and materials: replacement bubble gasket (correct profile and material), good sharp scissors or a fine-toothed hacksaw for rigid carriers, craft knife, isopropyl alcohol or proprietary cleaner, silicone remover if needed, small flat screwdriver, masking tape, a soft cloth, and sealant if manufactures recommend end seals.
- Measure the existing gasket: record profile type and nominal dimensions in mm. Take a photograph of the corner detail for reference; this helps if you need to buy a matching profile from /guides/gaskets-seals.
- Remove the old gasket carefully: ease out the gasket with a flat screwdriver or pull by hand for adhesive-backed versions. Clean the channel thoroughly and degrease with alcohol; old adhesive or crumbly rubber will prevent a good seal.
- If push-in: warm the gasket gently with a heat gun on a low setting to improve flexibility when forming corners; do not overheat as this can deform the compound. Start at one end and push profile into the channel; use masking tape to hold as you work around corners.
- For adhesive-backed seals: peel the backing as you press the gasket into place; apply steady pressure to bond. Allow adhesive cure time as the manufacturer recommends before operating the window.
- Trim ends slightly longer than required and compress to take up; for some frames you may need to splice ends together with a small silicone bead to ensure no gap.
- Test operation: lock and unlock casements or slide panels several times to check for binding; adjust if the gasket is stopping the locking mechanism from engaging smoothly.
When to call a fitter
There are circumstances where a professional fitter is the safer and more cost-effective choice. Call a fitter if any of the following apply:
- The gasket is recessed into a deep channel requiring sash or panel removal that would disturb sealed units or glazing beads.
- Seals are on aluminium thermally-broken frames with clip-in carriers or hidden fixings; these often need specialist tools and replacement parts.
- You are working on sliding bespoke doors, lift-and-slide systems or balcony door thresholds where precise compression and drainage interact with hardware.
- The frame is part of a fire door or smoke-sealing system; these installations have certified seals and must maintain test integrity.
- The window is under warranty or part of a listed building or conservation scheme where incorrect seals would void warranties or consent conditions.
- Multiple windows or whole-property refurbishment is needed; a fitter can programme work to match stocks and maintain consistency across all frames.
Trade tips for fitters and installers
- Keep a small range of common bubble gasket profiles in stock: P-profile, D-profile and various bulb diameters in EPDM and TPE; trade customers expect fast turnarounds.
- Always identify whether the original gasket is compression, glazing or perimeter type; substituting an incorrect profile may cause lock failure or water ingress.
- Use OEM-approved adhesives and follow cure times; cleaning the channel is often the difference between a long-lasting job and call-backs.
- Record frame types and gasket codes on job sheets; this reduces repeat visits for replacements on large sites.
Common pitfalls and how to avoid them
Avoid common mistakes by taking time at the start: do not force a gasket into a groove that is the wrong size, as this can split the profile or deform the frame. Do not use household solvents that can damage rubber compounds. When forming corners, do not cut too much material away; better to create a tight mitre and use a small bead of silicone to finish. Finally, always test hardware operation after fitting; multipoint locks and striker plates often need minor adjustment after new gaskets are installed.
Recommended Products
Based on this article, you may find these products helpful:
- B003 Bubble Gasket
- B004 Bubble Gasket
- B007 Bubble Gasket
- Multipoint Gearbox GU Old Style
- In-Line Window Mechanism
Conclusion and next steps
Replacing a bubble gasket is straightforward for many exposed, push-fit installations; it is a good DIY job if you have the right profile, tools and patience. However, for recessed channels, fire-rated doors, complex sliding systems or work that affects sealed glass warranty, a professional fitter is the safer option. For technical data, profile identification help and to view a selection of suitable gaskets, visit our pillar page: /guides/gaskets-seals. If you are unsure about the correct profile or need a site visit, contact a qualified fitter or our trade support team for product recommendations and fitting advice.