DIY Letterbox Insulation Solutions That Actually Work
DIY Letterbox Insulation Solutions That Actually Work A poorly sealed letterbox can undermine a well-insulated door: cold draughts, increased energy bills,...
DIY Letterbox Insulation Solutions That Actually Work
A poorly sealed letterbox can undermine a well-insulated door: cold draughts, increased energy bills, noise and rain driven through the slot are common complaints. A targeted letterbox draught excluder is one of the simplest, most cost-effective ways to reduce heat loss without replacing the door. This post explains practical DIY and trade-focused solutions for timber, uPVC and metal doors, plus installation tips that give lasting results.
Why letterbox draught excluders matter
Letterboxes are a direct path for outside air to reach the interior of a property. Even small gaps allow convective heat loss and cold air infiltration. A properly specified draught excluder reduces thermal transference and improves comfort; it also reduces dust, noise and light ingress. For trade professionals, a well-executed solution avoids callbacks and preserves door operation; for homeowners, it delivers immediate savings on heating costs.
Common types of letterbox draught excluder
- Brush seals: A pile brush fitted to the inside of the letterplate or to the flap; good for frequent use because brushes allow mail to pass while blocking draughts.
- Foam or sponge liners: Closed-cell foam strips or formed liners fixed to the internal frame; inexpensive and simple to fit for lower-traffic doors.
- Double-flap or magnetic flaps: A second internal flap usually lined with foam; magnetic seals give a firm closure and are effective at blocking cold air.
- Letterplate linings: Rigid or soft liners that sit behind the external plate to restrict direct airflow and create a secondary barrier.
- Combined solutions: Brush plus foam or a lined double flap delivers the best balance of airflow control and ease of use.
Selecting the right solution for the door type
Material and construction influence the choice of draught excluder:
- Timber doors: Rebate-friendly; you can fit brush strips into a shallow groove or screw a plate-mounted brush to the inside face. Use stainless steel or brass screws and countersink heads so the flap closes properly.
- uPVC doors: Many have factory-fitted letterplates. Avoid excessive heat or solvent-based adhesives; use purpose-made brush kits or adhesive-backed closed-cell foam that is compatible with uPVC.
- Metal doors: Secure fixings are essential; rivets or self-tapping galvanised/stainless screws work well. Watch for galvanic corrosion where dissimilar metals meet; use compatible fasteners and touch-up paint.
- Fire doors and communal doors: Check certification before modifying. Many fire-rated doors cannot be altered without nullifying the rating; consult the manufacturer or a fire-safety specialist.
DIY installation: step-by-step for common fixes
Below are straightforward procedures for popular draught-excluding methods. Always test the flap operation throughout the process to avoid obstructing mail delivery.
Brush strip installation
- Measure the internal width and depth of the letter slot and buy a brush strip of appropriate length and pile height; the pile should compress slightly when the flap closes.
- Remove the internal letterplate if possible. Place the brush so it sits just behind the flap; the brush should touch the flap lightly when closed.
- Mark, pre-drill pilot holes and secure the brush strip with stainless or brass screws. Countersink if needed to maintain a flush surface.
- Trim excess brush with scissors or shears and re-fit the plate. Test by inserting an envelope; ensure the flap still opens easily and mail passes through without bunching.
Foam liner or seal
- Clean the internal surface with isopropyl alcohol for good adhesion.
- Measure and cut closed-cell foam to size. Adhesive-backed foam is quickest; for non-adhesive foam use a flexible neutral-cure silicone adhesive compatible with the door material.
- Apply the foam to the internal frame around the slot or to the back of an internal flap; press firmly and allow adhesive cure time specified by the manufacturer.
- Check clearance for letters and ensure the flap closes fully. Replace foam if compressed flat over time.
Double flap or magnetic flap
- Fit a secondary internal flap with a foam seal or magnetic strip to create a two-stage barrier for air. This is especially effective for large or low-to-floor letterboxes.
- Ensure the inner flap does not trap mail; magnets should be strong enough to form a seal but not so strong that the postman cannot push letters through.
Trade tips for long-term performance
- Use closed-cell foam rather than open-cell for moisture resistance and better thermal performance.
- Select corrosion-resistant fixings for external and coastal locations; stainless steel prevents staining on lighter finishes.
- Where screws are visible, countersink and cap or apply small finishing plugs and touch-up paint to prevent water ingress and maintain aesthetics.
- Avoid over-tightening screws that distort thin metal plates or crack uPVC.
- Document any changes on fire doors and communal doors; include the modification in the building record and ensure compliance with local regulations.
- Keep maintenance in mind: brushes and foam degrade over time. Inspect annually and replace worn seals to maintain performance.
Practical considerations and potential pitfalls
Do not block ventilation that is required for the property; tightening up a single opening may increase condensation elsewhere. Avoid permanent modifications that impede the post; Royal Mail advises not to obstruct letter delivery, so allow enough clearance for typical mail sizes used in your area. For listed buildings, planning constraints may apply; always check before altering historic doors.
Tools and materials checklist
- Tape measure, pencil and masking tape
- Drill with appropriate bits and countersink
- Stainless or brass screws; rivets for metal doors if preferred
- Brush strip kit, closed-cell foam tape or internal flap kit
- Isopropyl alcohol, cleaning cloths and silicone adhesive or neutral-cure sealant
- Scissors, hacksaw or shears for trimming brushes and fixings
Recommended Products
Based on this article, you may find these products helpful:
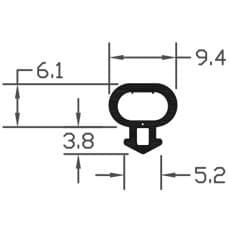
- E-Type Gasket - Black 5m Roll
- E-Type Gasket - Black (Per Metre)
- B003 Bubble Gasket
- B004 Bubble Gasket
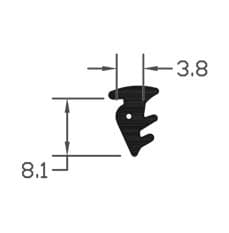
- SYS2 Wedge Gasket
Conclusion and next steps
Installing a letterbox draught excluder is a high-impact, low-cost improvement for both homeowners and trade professionals. Assess the door material and usage, choose a brush, foam or double-flap solution, measure carefully and follow correct fixing practice. For fire doors and communal entrances, seek manufacturer or specialist advice before altering the door. For more detailed product choices and fitting accessories, visit our pillar page: /guides/letterboxes. If you need hands-on support, contact our technical team for recommendations on suitable kits and fixings for your door type.
Products mentioned in this article

Related articles
Internal vs External Letterbox Draught Excluders: Which Works Better?
Internal vs External Letterbox Draught Excluders: Which Works Better? A letterbox is a small opening that can let in a disproportionate amount of cold air,...
How to Retrofit an Anti Arson Letterbox to an Existing Door
How to Retrofit an Anti Arson Letterbox to an Existing Door What is an anti arson letterbox and why retrofit one? An anti arson letterbox is a specialist l...
Letterbox Draught Excluder for Security: Added Protection
Letterbox Draught Excluder for Security: Added Protection A well-chosen letterbox draught excluder reduces heat loss and noise while contributing to a stro...