Dog Flap Installation in Walls: When a Door Isn't an Option
Dog Flap Installation in Walls: When a Door Isn't an Option Installing a dog flap through an external wall is a practical alternative when cutting a door i...
Dog Flap Installation in Walls: When a Door Isn't an Option
Installing a dog flap through an external wall is a practical alternative when cutting a door is impractical because of layout, planning constraints, or security concerns. This article covers what to consider before you start, how to choose the correct product, and step-by-step guidance for both competent DIYers and trade professionals working in the UK.
When to choose a wall-mounted dog flap
A wall-mounted dog flap is suitable when: the available external access is through a bay window, conservatory, or solid wall; there is insufficient space for a door; or you need a discreet, secure route for pets that avoids altering door furniture or door frames. Wall flaps work well for properties where internal layout would be compromised by a new door or where planning consent is unlikely for a structural change.
Assessing the wall and regulations
Start by identifying the wall type: solid brick, cavity brick, concrete block, or timber-frame. Wall thickness determines the length of the tunnel section required and influences fixing methods. Small openings for a dog flap rarely affect structural integrity; however, if you need to cut large areas or insert a substantial frame, consult a structural engineer or building control.
Check for hidden services before any cutting: use a cable avoidance tool (CAT) to locate electrics and metallic pipes; local utility plans can help identify gas or water runs. For listed buildings or conservation areas, contact your local authority beforehand: external alterations may need listed building consent.
Choosing the right dog flap and tunnel system
Select a product designed for through-wall installation: these include a tunnel kit that bridges the inner and outer frames and provides a secure, insulated channel. Consider the following features:
- Size: measure your pet across the widest point and add clearance; the flap should allow comfortable passage without stooping.
- Security options: mechanical locks, integral lockable covers, and microchip-controlled flaps to prevent other animals from entering.
- Material and finish: UV-stable plastics, aluminium or stainless steel for external faces are more durable; choose corrosion-resistant fixings for coastal locations.
- Insulation: look for flaps with thermal inserts or the ability to fit foam-filled tunnel lengths for better U-values.
Step-by-step installation: trade and DIY guidance
Recommended tools and consumables: spirit level; tape measure; multicutter or angle grinder for brick chiselling; SDS hammer drill with masonry bits; core drill for neat circular openings where appropriate; jigsaw for plasterboard; stainless steel screws; rawl plugs or chemical anchors; expanding foam for insulation; weatherproof silicone; mortar and render for external finishes; PPE including dust mask and eye protection.
- Measure and template: position the flap at a comfortable height for the animal; account for external thresholds or paving. Use the manufacturer template to mark the opening on both inner and outer faces.
- Check wall cavity: if cavity wall, confirm cavity width and whether insulation is present; this determines tunnel length and whether cavity tray or flashing is required to prevent moisture transfer.
- Create the opening: for masonry, score the outline and chisel or use an SDS chisel to remove material. For neat edges and less dust, a core drill can create starter holes. For timber-frame walls, cut with a saw and install reinforcing packers where required.
- Fit the tunnel: insert the tunnel piece so that it sits squarely between the inner and outer frames; use packers to ensure even compression and alignment.
- Secure frames: fix the inner and outer frames with corrosion-resistant screws into solid substrate or suitable anchors into blocks. For soft or hollow substrates, use chemical anchors or resin plugs for a reliable hold.
- Seal and insulate: fill gaps around the tunnel with low-expansion foam for thermal performance; trim excess once cured and apply flexible silicone joints to protect against water ingress. Avoid relying on foam alone for structural support.
- Finish inside and out: plaster, render and paint the internal reveals; use pointing mortar or matching render externally. Provide a small external cill or slope to encourage water run-off.
- Fit flap mechanism and test: complete the installation by attaching the flap panel and any electronic controls; ensure the flap swings freely and that locking functions operate correctly. Observe the pet using the flap and adjust sensitivity or flap stiffness as needed.
Security, weatherproofing and insulation
Security and weatherproofing are essential. Choose flaps with secure locking modes and anti-lift features. For electronic models, ensure the power supply is correctly installed and weatherproofed. Insulation around the tunnel is crucial in UK climates: use closed-cell insulation or purpose-made thermal inserts rather than relying on open-cell foam, which can absorb moisture.
Drainage must be considered for cavity walls: provide a cavity tray or weep path to avoid trapped moisture. External sealing should be done with UV-stable silicone and mortar; avoid gaps that could let drafts or pests in. For timber frames, use breathable membranes around the incision and install timber-friendly packers and fixings to prevent moisture transfer into structural timbers.
Tips for tradespeople
- Use the manufacturer template and pre-fit frames where possible off-site to check fit; this reduces site adjustments.
- When fixing into blockwork, aim to secure into the inner leaf where possible for a stronger hold; resin anchors provide high pull-out resistance for retrofits.
- For multi-leaf cavities, source or fabricate tunnel sections in matching lengths and ensure all joints are sealed; galvanised or stainless steel collars can improve long-term durability.
- When working on the external face, finish neatly with a bead of coloured silicone to match mortar; consider using a matching brick slip or render to disguise the aperture for a better aesthetic result.
- Allow for future service access when concealing electric cables for electronic flaps; use conduit and accessible junction boxes.
Recommended Products
Based on this article, you may find these products helpful:
- In-Line Window Mechanism
- Offset Window Mechanism
- Cat Mate Electromagnetic Cat Flap
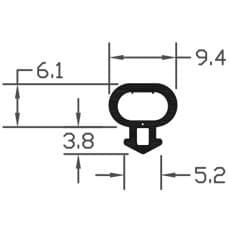
- B003 Bubble Gasket
- B004 Bubble Gasket
Conclusion and next steps
Installing a dog flap through a wall is a valuable solution when a door is not an option, but it requires careful assessment of wall construction, waterproofing, insulation and security. For competent DIYers, follow the manufacturer template closely and use appropriate PPE and tools. For tradespeople, plan fixes and sealing to industry standards and consider resin anchors or galvanised fittings for durability.
To compare product types and get further technical specifications, visit our pillar resource at /guides/pet-flaps. If you are unsure about structural issues or working on a listed building, contact a structural engineer or your local planning authority before proceeding.


Related articles
Replacing uPVC Door Panels with Cat Flap Panels: A Cleaner Solution
Replacing a uPVC door panel with a purpose-made cat flap panel is a practical way to give pets easier access while keeping the rest of the door intact. Whe...
Rented Property Cat Flap Options: What Landlords Need to Know
Rented Property Cat Flap Options: What Landlords Need to Know Installing a cat flap in a rented property can improve tenant satisfaction but it raises ques...
Dog Flap Insulation: Preventing Heat Loss Through Larger Pet Doors
Dog Flap Insulation: Preventing Heat Loss Through Larger Pet Doors Large dog flaps are convenient for owners and pets, but they create a significant therma...