How to Measure for a Letterbox Draught Excluder
How to Measure for a Letterbox Draught Excluder Choosing and fitting the correct letterbox draught excluder requires accurate measuring to get both a weath...
How to Measure for a Letterbox Draught Excluder
Choosing and fitting the correct letterbox draught excluder requires accurate measuring to get both a weather-tight seal and an unobstructed letter flap. This post covers straightforward measuring techniques for homeowners and trade professionals, practical considerations for different door and letterbox types, and trade tips to avoid common installation issues.
Identify the letterbox type and location
Begin by noting the type of letterbox you have: surface-mounted flap, through-door aperture with internal cover plate, rimless slot or specialised security plate. Also note whether the letterbox is on an external front door, a communal/flat entrance, or an internal door. Fire doors and communal entrance doors often require tested components; if the door is a certified fire door you must use a certified letterplate and follow the manufacturer’s installation instructions.
Tools you will need
- Tape measure (metric)
- Digital calipers or vernier calipers for precise thickness readings
- Straight edge or small spirit level
- Pencil or marker and masking tape for marking
- Feeler gauge or small ruler for gap checks
- Screwdriver set if you need to remove the letterplate for measurement
Step-by-step measuring procedure
-
Measure the aperture width: Measure the clear opening of the slot from the inside face of the door. If the slot is tapered or irregular, measure the narrowest point. Record to the nearest millimetre.
-
Measure the aperture height: Measure the vertical distance of the slot opening at the narrowest point. For thin letter slots a small error can matter, so measure in two places and note the smaller dimension.
-
Measure door thickness: Use calipers to measure the thickness of the door leaf at the location of the slot. Many aftermarket excluders specify a door thickness range; check this so the fixings and internal seal sit correctly.
-
Measure reveal depth (for through-door slots): From internal face to external face measure the length of the recess. This matters if fitting a brush seal that needs to sit inside the aperture or if the letterplate has a projecting flap on the outside.
-
Measure surrounding clearance: Allow space for the external and internal faceplates and any screws. Measure from the slot edges to the nearest handle, lock or moulding. This prevents overlap with other hardware.
-
Check flap swing and clearance: Open and close the letter flap and check for obstruction from a proposed excluder; some brush seals sit behind the flap and require a small amount of free space. Allow 5 to 10 mm clearance so the flap operates freely.
What measurements matter for different excluder types
-
Brush strip inserts: The most important dimensions are aperture width, reveal depth and door thickness. Brushes usually need to sit centrally through the slot so confirm depth to avoid brushes rubbing on the external flap.
-
Internal letterplate draught excluders: These attach to the internal faceplate and must cover the slot fully. Measure the internal faceplate outer dimensions if retrofitting to an existing plate; if replacing the plate you need to know the aperture size to choose the correct plate size.
-
Surface-mounted flap seals: These fit over the external flap rather than inside the slot. Measure the flap width and height and the clearance when the flap is closed; you may need to allow for additional projection for external weatherproofing.
Practical trade advice and tolerances
-
Measure twice: Always verify critical dimensions twice and record them. Tradespeople should check both faces of the door when possible for irregularities.
-
Allow overlap: For a snug seal choose an excluder that overlaps the slot edges by 5 to 10 mm each side; this avoids draught paths caused by uneven cuts and gives margin for seal compression.
-
Door finish and material: Softwood, hardwood, composite and metal doors each respond differently to fixings. For metal doors you may require pop rivets or self-tapping screws; for composites use low-profile fixings to avoid splitting or laminate damage.
-
Security and fire considerations: For external doors leading to communal areas or flats confirm requirements for anti-tamper screws or internal cages. For certified fire doors use only tested letterplate assemblies and install intumescent and smoke seals as specified.
-
Order multiple sizes or adjustable models: For sites with non-standard slots consider adjustable brush cores or excluders with cut-to-fit options. Tradespeople often carry a small range of standard widths to match most doors on first visit.
Retrofitting tips and finishing touches
-
If the slot edges are uneven use a thin bead of flexible sealant behind the faceplate to close gaps; avoid using rigid filler that will crack with door movement.
-
When securing faceplates use countersunk or security screws and ensure screw lengths match door thickness; too long and you penetrate finishes, too short and the plate may pull away.
-
For exposed external letterboxes choose corrosion-resistant materials such as stainless steel or powder-coated aluminium; brush filaments should be weatherproof to retain shape and effectiveness.
-
Test operation after fitting: Post-installation open and close the letter flap several times, and slide a letter through to ensure the seal does not impede posting.
Maintenance and checks
Check draught excluders annually: clean accumulated dust from brush seals, inspect for UV degradation on external seals and tighten fixings. Replace worn brushes or degraded foam seals to maintain performance. If security or fire performance is a requirement, re-check compliance with manufacturer guidance after any replacement.
Recommended Products
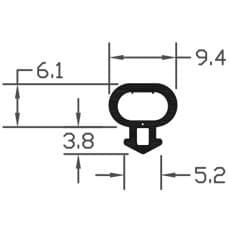
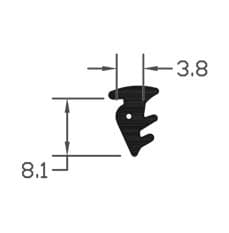
Based on this article, you may find these products helpful:
- E-Type Gasket - Black 5m Roll
- E-Type Gasket - Black (Per Metre)
- B003 Bubble Gasket
- B004 Bubble Gasket
- SYS2 Wedge Gasket
Conclusion and next steps
Accurate measuring is the key to a successful letterbox draught excluder installation: record aperture width and height, door thickness and reveal depth, and allow small overlaps for a reliable seal. For trade installations, carry common sizes and adjustable units and always confirm fire or communal door requirements before fitting. Next steps: double-check your measurements, decide on the excluder type suited to the door and environment, and contact a supplier with exact dimensions to order the correct product or a bespoke solution.
Products mentioned in this article

Related articles
Internal vs External Letterbox Draught Excluders: Which Works Better?
Internal vs External Letterbox Draught Excluders: Which Works Better? A letterbox is a small opening that can let in a disproportionate amount of cold air,...
How to Retrofit an Anti Arson Letterbox to an Existing Door
How to Retrofit an Anti Arson Letterbox to an Existing Door What is an anti arson letterbox and why retrofit one? An anti arson letterbox is a specialist l...
Letterbox Draught Excluder for Security: Added Protection
Letterbox Draught Excluder for Security: Added Protection A well-chosen letterbox draught excluder reduces heat loss and noise while contributing to a stro...