
How to Remove and Replace a Wedge Gasket Without Damaging the Frame
How to Remove and Replace a Wedge Gasket Without Damaging the Frame A failing wedge gasket can cause draughts, water ingress and poor thermal performance. ...
How to Remove and Replace a Wedge Gasket Without Damaging the Frame
A failing wedge gasket can cause draughts, water ingress and poor thermal performance. Whether you are a trade professional working on uPVC, aluminium or timber frames, or a DIY-savvy homeowner, the correct removal and replacement of a wedge gasket is straightforward if done carefully. This post covers practical steps and trade tips to remove an old wedge gasket and fit a new one without damaging the frame or the glazing.
When to replace a wedge gasket
Signs that a wedge gasket needs replacement include visible cracking or hardening, a loss of compression, water leaks at the bead line, rattling glass, or difficulty in achieving weatherseal during closing. Older EPDM and foam gaskets commonly perish with age; silicone wedge gaskets can last longer but still wear. If the sash requires regular adjustment to seal, the wedge gasket could be the cause.
Tools and materials
Having the right tools reduces the risk of damage. Typical items you will need:
- Replacement wedge gasket of the correct profile and material (EPDM, silicone, PVC)
- Flat non-marring trim tool or plastic spatula
- Small flat-head screwdriver (use carefully)
- Long-nose pliers or gasket puller
- Heat gun or hairdryer (low heat setting)
- Isopropyl alcohol or a mild solvent and clean rags
- Masking tape to protect surfaces
- Lubricant recommended by the gasket manufacturer; a soap-and-water solution will do for EPDM
- Measuring tape and marker
- Gloves and safety glasses
Preparation: measure and order the correct wedge gasket
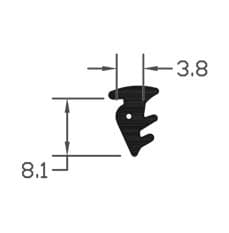
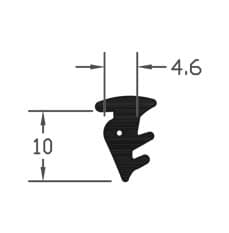
Measure the existing gasket cross-section and the channel or glazing bead where it sits: width, height and whether the gasket is a single-lipped wedge or a double-lip design. If you still have a sample, measure the internal measurements of the wedge. Many wedge gaskets are sized by feed length and profile code; match material type to application: EPDM for general sealing, silicone for high-temperature or fire-rated settings, PVC for specific framing systems.
Order a slightly longer length than required to allow for trimming and for compression at corner joins. Check our pillar reference for other gaskets and seals: /guides/gaskets-seals.
Step-by-step: removing a wedge gasket without damaging the frame
- Support the sash or door: Fully support glazed units before working; glass should never be left unsupported. If removing the gasket on a fixed pane, consider removing the bead only if trained; otherwise work from the accessible side.
- Protect the frame: Apply masking tape along the frame edge where you will be working to avoid scratches from tools.
- Soften the gasket if necessary: Use a heat gun or hairdryer on low heat to warm the gasket slightly; this softens older EPDM and makes it easier to pull out. Do not overheat; keep the gun moving and maintain a safe distance to avoid warping the frame or damaging paintwork.
- Start at a corner or an end: Use a plastic trim tool to lever the gasket out; slide the tool under the edge and pull the gasket gently with pliers. Work slowly along the length; avoid levering against the frame edge directly.
- Remove adhesive residue: If the gasket was bonded, use isopropyl alcohol to dissolve residue; apply with a rag and a plastic scraper. Never use aggressive solvents on painted or sealed timber without testing first.
- Inspect the channel and glazing bead: Check for sharp paint edges, old sealant beads or protruding screws that could tear the new wedge gasket; address these issues before fitting the new gasket.
Installing the new wedge gasket
- Clean the area: Ensure the channel or bead is free from dust, grit and any remaining adhesive; a clean surface ensures a good seal and prevents abrasion.
- Cut and prepare lengths: Cut the gasket slightly longer than each side. For corners, many fitters use butt joints for wedge gaskets; mitred corners can be used on some profiles but avoid overstretching the material at corners.
- Lubricate if recommended: Some wedge gaskets slide into channels more easily with a light smear of soapy water or a manufacturer-recommended lubricant; apply sparingly to avoid attracting dirt.
- Start at one end and feed the gasket into the channel: Use your fingers or a plastic tool to press the wedge into the groove. Work in short sections; avoid pulling the gasket tight as this will cause it to creep back over time and may warp frame corners.
- Form joints carefully: For butt joints, ensure ends meet squarely with minimal gap; compress gently to achieve seal. If adhesive is required at joints, use a compatible adhesive sparingly; overuse can prevent proper compression.
- Trim excess: Once the full run is in place, trim any surplus cleanly with a sharp blade and press the end into place so it seats against the frame or bead snugly.
Finishing, testing and common mistakes to avoid
- Operate the sash or door several times to seat the gasket: Warm up and compression will help the gasket settle into its working position.
- Perform water and draught checks: A simple hose test or draught detector can confirm the seal. Allow 24 hours for any adhesive to cure and for the material to relax.
- Avoid overstretching: Stretching the gasket during installation is a common fault; it will retract and leave gaps at corners. Fit without tension; use slightly longer lengths if needed.
- Do not use aggressive solvents on painted frames: These can damage lacquer and sealants; test solvent on a hidden area if unsure.
- Match materials: Mixing incompatible materials or adhesives can reduce lifespan. Use the gasket material recommended for your frame type and application.
Recommended Products
Based on this article, you may find these products helpful:
- SYS2 Wedge Gasket
- SYS4 Wedge Gasket
- E-Type Gasket - Black 5m Roll
- E-Type Gasket - Black (Per Metre)
- Structural Glazing Tape - 20mm
Conclusion and next steps
Replacing a wedge gasket is a task that rewards patience and the use of the right tools. Careful removal, measurement and installation will restore weather performance without damaging frames or glazing. For trade users: keep a selection of common profile wedges in stock and log the profile codes you encounter; this speeds up site work. For homeowners: if the unit is tricky to access, heavily bonded or the glazing bead needs removal, contact a qualified installer.
For more information on seals, profiles and compatible adhesives see our pillar resource: /guides/gaskets-seals. If you need specific gasket profiles or trade quantities, visit our product pages or contact our technical team for advice on matching wedge gasket profiles to your frames.
Products mentioned in this article
Related articles
Wedge Gasket Sizes Explained: Finding the Perfect Fit for Your Glazing
Wedge Gasket Sizes Explained: Finding the Perfect Fit for Your Glazing Why the correct wedge gasket matters A wedge gasket is a triangular or tapered seali...
Wedge Gasket vs Flip Gasket: Choosing the Right Seal for Double Glazing
Wedge Gasket vs Flip Gasket: Choosing the Right Seal for Double Glazing Why the right gasket matters Seals are a small component with a big job: they keep ...
Wedge Gasket Installation Guide: Achieving a Watertight Seal Every Time
Wedge Gasket Installation Guide: Achieving a Watertight Seal Every Time A correctly fitted wedge gasket is one of the simplest and most effective ways to p...