Self-Adhesive Draught Seals: Are They Any Good? Honest Review
Self-Adhesive Draught Seals: Are They Any Good? Honest Review Introduction A self-adhesive draught seal is a quick solution for unwanted gaps around doors ...
Self-Adhesive Draught Seals: Are They Any Good? Honest Review
Introduction
A self-adhesive draught seal is a quick solution for unwanted gaps around doors and windows. For homeowners and trade professionals in the UK, the appeal is obvious: simple application, no special tools, and an affordable way to reduce cold air ingress and heat loss. But are they any good for long-term performance? This post reviews the main types, practical installation tips, limitations, and when a more robust solution is required.
What is a self-adhesive draught seal?
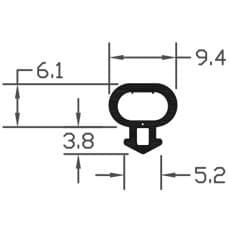
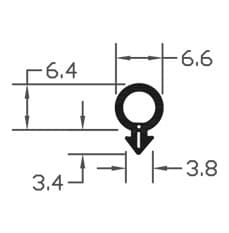
Self-adhesive draught seals are pre-formed strips or profiles with an adhesive backing. They come in materials such as EPDM rubber, silicone, closed-cell foam, and PVC. Profiles include P-shaped, D-shaped, V-shaped, and tubular bubble seals; each profile suits different gap sizes and movement characteristics. The adhesive is typically an acrylic or butyl-based tape designed to stick to timber, uPVC, aluminium, and painted surfaces.
Where they work well
- Internal and external doors with consistent gaps under 10 mm
- Window sashes that rub lightly and need a low-profile seal
- Letterboxes and loft hatches for quick draught reduction
- Temporary fixes on newly fitted frames before full mechanical sealing
Pros and cons
- Pros: Fast to fit; low cost; no screws or drilling; range of profiles for different gaps; immediate improvement in comfort and energy use.
- Cons: Adhesive performance varies with surface and temperature; not suitable for very irregular or dirty surfaces; limited lifespan compared to mechanically fixed gaskets; some materials compress and take set, reducing effectiveness over time.
How to choose the right draught seal
Selection should be based on gap measurement, movement, and the substrate. Measure the largest gap in millimetres: small gaps of 2 to 5 mm suit V or P profiles; larger gaps up to 10 mm are better with tubular or D-shaped seals. For moving sashes choose low-friction materials such as silicone or specialised PVC to avoid wear. For timber and painted surfaces a standard acrylic-backed seal will usually adhere well; for powder-coated aluminium and other low-energy surfaces use a seal with stronger adhesive or a primer.
Practical installation: DIY steps
Correct preparation is crucial for a durable bond. Follow these steps for best results:
- Clean the surface: remove dust, grease, and old adhesive with a cloth and warm soapy water; finish with isopropyl alcohol or methylated spirits for a secure surface.
- Dry thoroughly: adhesives will not bond well on damp surfaces; aim to fit at temperatures above 5 degrees C; adhesives work best between 10 and 25 degrees C.
- Measure and cut: measure lengths carefully, cut with sharp scissors or a utility knife, and avoid stretching the seal during application.
- Trial fit: position the strip without removing the backing to check alignment; ensure the profile will compress correctly when the door or window closes.
- Apply pressure: remove backing and press firmly along the length; use a roller or a block of wood to apply even pressure for at least 30 seconds per section.
- Cure time: avoid heavy use for 24 hours so the adhesive can develop full strength.
Tips for trade professionals
- Specify adhesive type for low-energy substrates; consider primer or mechanical fixing for high-wear external doors.
- For frequently used commercial doors select durable elastomer seals and check compressibility and compression set values from the manufacturer.
- Stock a range of profiles and colours to match client needs; a neat finish reduces callbacks.
- For project quotes, quote both tape-backed and mechanically fixed gasket options; clients may prefer a longer-lasting mechanical fix despite higher cost.
Common problems and how to avoid them
- Poor adhesion: usually due to dirty or painted surfaces that have not cured; prepare surfaces carefully and consider a primer for difficult substrates.
- Crushing or set: foam seals can compress permanently; choose EPDM or silicone for better resilience.
- Interference with operation: profile too thick or wrongly positioned; always trial fit before final adhesion.
- Weather exposure: many self-adhesive seals are fine for sheltered external use; for exposed external doors choose seals rated for UV and cold resistance or consider mechanical gaskets.
Maintenance and expected lifespan
Self-adhesive draught seals typically last between 3 and 10 years, depending on material, exposure, and usage. Inspect seals annually: look for lifting, cracking, or flattening. Clean with mild detergent; avoid aggressive solvents that will attack some rubbers. Replacement is straightforward: peel off old material, clean residue with a dedicated adhesive remover, and refit a new seal following the preparation steps above.
When not to use them
Do not rely on self-adhesive draught seals where a continuous airtight barrier is required for building regulations compliance; do not use them as the sole solution for heavily used external doors subject to high wind loads; and avoid them where fire-rating or acoustic performance is a regulated requirement unless the product has the necessary certification.
Recommended Products
Based on this article, you may find these products helpful:
- E-Type Gasket - Black 5m Roll
- E-Type Gasket - Black (Per Metre)
- B003 Bubble Gasket
- B004 Bubble Gasket
- B007 Bubble Gasket
Conclusion and next steps
Self-adhesive draught seals are a practical, cost-effective way to reduce drafts and improve comfort when chosen and fitted correctly. They suit many domestic and light commercial applications but have limitations in durability and adhesion on challenging substrates. For best results measure gaps accurately, prepare surfaces thoroughly, and select the right profile and adhesive type for the job. For trade professionals consider specifying mechanical fixing or higher-performance elastomers where longevity is critical.
Next steps: assess the gaps in your frames, choose the appropriate profile, and read product spec sheets carefully. For additional technical information on gaskets and seals see our pillar resource at /guides/gaskets-seals or contact our sales team for sample swatches and technical data.
Products mentioned in this article

Related articles
Draught Seal Types Compared: Foam, Rubber, Brush, and Compression
Draught Seal Types Compared: Foam, Rubber, Brush, and Compression Draught seal selection matters for energy efficiency, comfort, and the longevity of windo...
How to Prepare Surfaces for Draught Seal Installation: Getting Adhesion Right
How to Prepare Surfaces for Draught Seal Installation: Getting Adhesion Right Proper surface preparation is the single most important factor for long-lasti...
How to Fit Draught Seals Around Windows: Complete Installation Guide
How to Fit Draught Seals Around Windows: Complete Installation Guide Fitting a draught seal is one of the most cost-effective ways to reduce heat loss, eli...