Which Wedge Gasket Profile Do I Need? Identification Guide with Photos
Which Wedge Gasket Profile Do I Need? Identification Guide with Photos A wedge gasket seals the gap between a window or door sash and the frame; it keeps d...
Window Hardware Store
7 February 2026
5 min read
Which Wedge Gasket Profile Do I Need? Identification Guide with Photos
A wedge gasket seals the gap between a window or door sash and the frame; it keeps draughts, water and noise out while allowing controlled compression when the window is closed. Choosing the right wedge gasket profile is essential for a weatherproof repair or upgrade. Below are clear identification tips, photo guidance and practical trade and DIY advice to help you select the correct profile for uPVC, timber and aluminium windows and doors.
What is a wedge gasket and where it is used
A wedge gasket is an extruded seal, typically made from EPDM rubber, PVC or TPE, with a triangular or tapered cross-section. It is commonly fitted to the sash perimeter, glazing rebate or into a groove in the frame. The wedge shape allows a narrow leading edge to compress into a wider sealing face; this gives a good compromise between ease of closing and effective sealing against wind and rain.
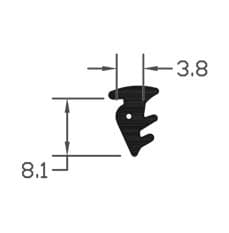
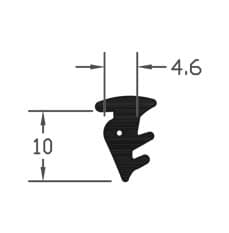
Common profile shapes to recognise (with photo examples)
Take a clear cross-section photograph of your existing seal with a ruler for scale. The key identification features are the base fixing method, the cross-section shape and the overall dimensions. Use the photos below as reference; replace the placeholders with your own images when contacting a supplier.
Triangular wedge gasket cross-sectionTriangular (classic wedge) profile: a simple triangular or tapered shape; often used on sash perimeters and glazing beads. Base may be solid or hollow. Look for a narrow leading edge and a wider foot that sits in the groove.
Hollow wedge gasket profileHollow wedge: similar to triangular but with an internal hollow to increase compressibility; common where more movement or a softer seal is required.
Push-fit wedge gasket with finPush-fit base: the gasket has a T-shaped or finbed base that snaps into a slot in the frame. Measure the width and depth of the base; push-fit dimensions are critical for compatibility.
Adhesive-backed wedge gasketAdhesive-backed: flat base with factory-applied adhesive tape; used where a groove is not available. Check the adhesive performance for exposed conditions.
Wedge gasket used with glazing beadGlazing bead wedge: small triangular gasket used between glass and bead; often softer and narrower to avoid stress on the double glazed unit.
How to measure and photograph your gasket for ordering
Clear measurements and photos speed up identification. Follow these steps:
Remove a short length of the existing gasket if safe and practical. For DGU work, support the glass and get assistance.
Measure cross-section: overall height, overall width and base width (for push-fit). Use a vernier or accurate ruler and record in millimetres.
Take three photos: a close-up of the cross-section, a photo showing how it sits in the frame, and a photo of the frame as a whole for context. Include a ruler in the close-up photo for scale.
Note material: most wedge gaskets are EPDM (rubbery, matt black), PVC (glossier, firmer) or TPE. If in doubt, describe hardness: soft/flexible or stiff.
Practical trade advice: specifying the correct product
For trade professionals ordering volumes, the following details avoid returns and mismatches:
Specify profile code if available from the original manufacturer or supplier; include a sample length of 50–100 mm if possible.
State base fixing: push-fit, adhesive, or loose. Push-fit profiles must match groove dimensions within 0.5 mm for a secure fit.
Give Shore A hardness for performance-critical applications; softer seals compress more but may have a shorter life in heavy exposure.
Order extra length to allow for mitring and wastage; typical advice is 10 to 15 percent extra per window run.
Where installations require compliance, check compatibility with sealed double glazing units; avoid hard rigid seals that can stress the glass.
DIY replacement: tools, tips and pitfalls
If you plan to replace a wedge gasket yourself, these practical pointers will help:
Tools: gasket removal tool or flat screwdriver, sharp knife, clean cloth, soapy water or manufacturer recommended lubricant, mitre block for neat corners, adhesive if required.
Removal: gently prise out the old seal; for push-fit types use a small hook tool to avoid damaging the groove or bead. Take care with glass edges.
Cleaning: remove old adhesive and dirt; use isopropyl alcohol for resin residues. Ensure the groove is dry before fitting adhesive-backed seals.
Fitting: warm flexible EPDM in warm water if stiff; push-fit bases may require even pressure along the length; do not use excessive force that could deform the profile.
Corners: mitre the gasket to 45 degrees for neat joints; for rounded corners use factory-formed corner pieces if available.
Common pitfalls: ordering based on colour alone; assuming all triangular seals are interchangeable; not checking base width for push-fit types; working without supporting the glass.
When to call a professional
Contact a trained window fitter when the gasket replacement requires removing the glazing bead or sealed unit, when the frame is distorted, or when security hardware is affected. A professional can also advise on matching thermal performance and acoustic requirements if needed.
Further resources and how we can help
For more detailed profiles and technical drawings visit our pillar page on gaskets and seals: /guides/gaskets-seals. If you are unsure, email a clear photo with a ruler and the measurements to our sales team; include the window type (uPVC, timber, aluminium) and whether the seal is sash perimeter or glazing rebate.
Recommended Products
Based on this article, you may find these products helpful:
To identify the correct wedge gasket: photograph the cross-section with a ruler, measure width and height, note the base fixing and material, and compare with sample images or supplier codes. For a quick outcome: remove a 50 mm sample, take clear photos, and contact your supplier with measurements. If you prefer, bring the sample to a trade counter for an on-the-spot match. Proper identification avoids wasted material and ensures a long-lasting weather seal.