Best Window Restrictors for Child Safety: Trade Picks
Best Window Restrictors for Child Safety: Trade Picks Choosing the right window restrictor is essential for preventing falls while maintaining ventilation ...
Best Window Restrictors for Child Safety: Trade Picks
Choosing the right window restrictor is essential for preventing falls while maintaining ventilation and emergency egress. This post covers the best types of restrictors for trade professionals and homeowners, practical installation advice, and how to match products to common window types in the UK. Use the information below to specify or fit reliable, compliant solutions and to advise clients correctly.
Why fit a window restrictor
Window falls are a real risk for young children. A correctly specified and fitted window restrictor limits the opening while allowing airflow and adult access. For landlords, builders and installers, fitting an appropriate restrictor demonstrates duty of care; for homeowners it gives peace of mind. Always balance child safety with the need for emergency escape and ventilation.
Types of restrictors and when to use them
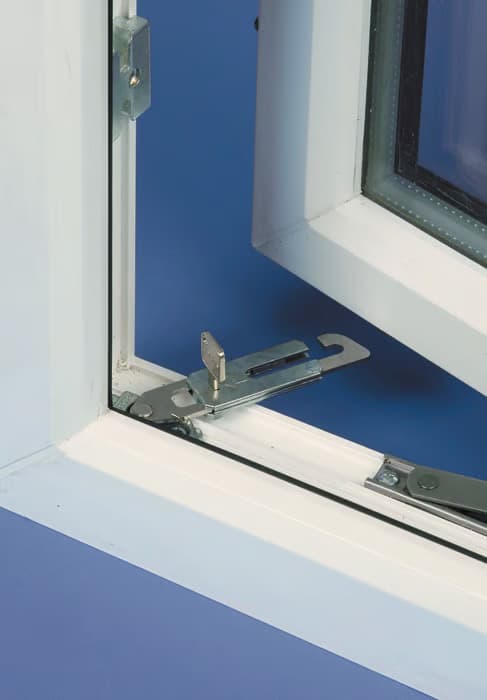
- Key-operated restrictors: Locked with a key; good for ground and first-floor windows where controlled access is needed. Pros: secure; cons: key loss or delay in emergency unless a quick-release option is elsewhere.
- Quick-release or tool-free restrictors: Allow adults to release the restrictor from inside without tools; ideal where emergency egress is required. Recommended for bedrooms and flats where escape routes must be preserved.
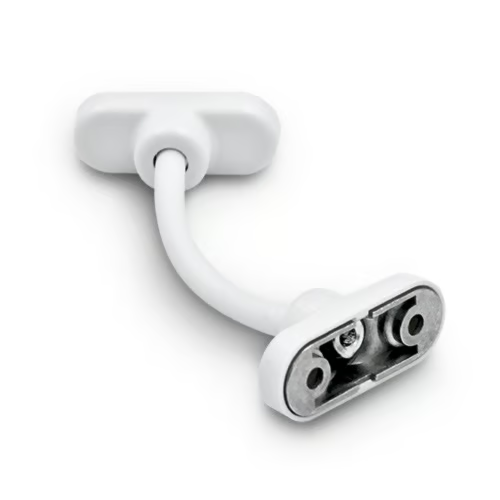
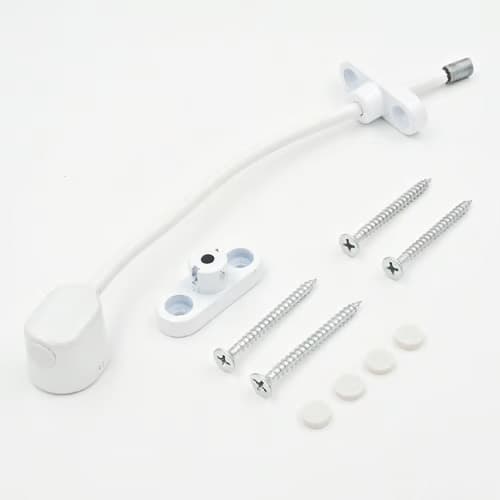
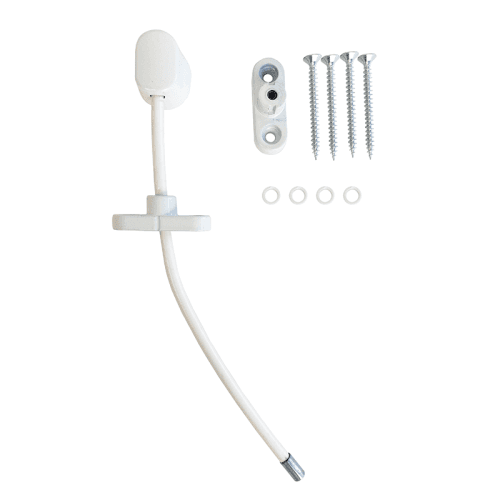
- Cable and chain restrictors: Flexible and suitable for outward-opening casements and timber sashes; they limit travel and break away under excessive load. Pros: low profile and cost-effective; cons: can be cut or degraded over time and may be less suitable for high-wind areas.
- Adjustable friction restrictors / stay restrictors: Provide graduated control of opening angle and are often used on timber or aluminium casements. Useful where ventilation needs vary.
- Sash window restrictors and sash spigots: Designed for traditional vertical sliders; they can be retrofit kits that lock the sash travel or limit the opening.
- Hinge restrictors and restrictor arms for tilt-and-turn windows: Mounted to the frame and sash to prevent full opening; choose units rated for the sash weight and wind load.
Trade picks: best options by application
- Family homes with children: Quick-release restrictors on all upstairs bedroom windows. Use models that limit openings to around 100 mm; ensure release action is straightforward for adults.
- Flats and shared accommodation: Key-operated restrictors combined with at least one quick-release on escape windows. Consider keyed units that are operated by a landlord or responsible adult while retaining an emergency option.
- Timber and heritage windows: Adjustable friction stays or sash spigots; use corrosion-resistant finishes and fixings that match the timber work to avoid damage.
- UPVC and composite frames: Restrictors designed for UPVC with correct screw lengths and plastic-lined fixings; use packers behind the frame face where reinforcement is required.
- Aluminium frames: Choose restrictors that can be riveted or use self-tapping screws rated for thin-gauge metal frames; avoid relying solely on soft materials for load-bearing fixings.
Practical installation guidance
Correct fixing and testing matters as much as the product chosen. The following steps are standard practice for trade professionals and competent DIYers:
- Check the window type and load: note sash weight, opening direction and frame material before ordering the restrictor.
- Mark positions: fit restrictors high on the frame where children cannot reach; ensure the operating mechanism is accessible to adults.
- Pre-drill pilot holes: choose drill bit size to suit the screw; pre-drilling reduces split timber and avoids overtightening into UPVC or aluminium.
- Use recommended fixings: many restrictors include manufacturer-specified screws; use stainless steel for external-facing or high-humidity locations.
- Packing and reinforcement: on hollow UPVC or thin aluminium frames use packers or reinforcing blocks behind the face to prevent screw pull-through; rivets are an option for aluminium.
- Set opening limit: adjust the restrictor to the required maximum gap. A commonly used safe limit for child protection is around 100 mm; confirm with local guidance and client requirements.
- Test operation: operate the restrictor repeatedly to ensure smooth action; check the window can still be fully closed and sealed, and that escape can be achieved where required.
- Label and handover: leave operating instructions and any keys with the client; note which windows have quick-release devices for emergency responders.
Common installation pitfalls and how to avoid them
- Incorrect fixings: do not use short screws in hollow frames; use the length and type recommended by the restrictor manufacturer.
- Poor positioning: fitting a restrictor low on a frame can be defeated by a determined child. Fit higher and out of reach.
- Ignoring ventilation and escape: never fit restrictors that prevent compliance with means-of-escape requirements; use quick-release units if needed.
- Mixing incompatible hardware: ensure the restrictor does not foul hinges, handles or stays when the window is closed or opened.
- No maintenance plan: restrictors are moving parts; schedule checks and replace if there is corrosion, play or wear.
Testing, standards and warranties
While product standards may vary, always choose restrictors with clear manufacturer test data for cycle life and load rating. Check any available conformity to British or European hardware standards and ensure the product has a suitable warranty. For social housing or commercial work, specify restrictors that come with certification or performance data so you can record compliance for audits.
DIY vs trade fitting: when to call a professional
Competent DIYers can fit many restrictors to standard windows if they follow instructions, use the right tools and test the result. Call a professional where:
- The window is large, heavy or in a high wind exposure area;
- The frame is aluminium or non-standard and requires riveted fixings or reinforcement;
- Escape requirements are complex and need integrated quick-release systems;
- There is any doubt about positioning, airtightness or weatherproofing after fitting.
Next steps and further resources
Decide on the restrictor type that suits the window and the occupants: quick-release for escape windows, keyed for controlled access, or adjustable for mixed-use. Measure and record frame material and sash weight before ordering. For product options and more on window security and locks, see our pillar resource at /c/windows-restrictors and consult manufacturer datasheets for fixing recommendations and test results.
Conclusion: fitting the right window restrictor is a straightforward way to dramatically reduce the risk of falls for children while keeping ventilation and escape routes functional. Specify products with clear performance data, use correct fixings and position restrictors out of reach. If in doubt, engage a qualified installer to ensure safety and compliance.
Recommended Products
Based on this article, you may find these products helpful:
Related articles
Window Restrictors
What Is a Cable Window Restrictor? How They Work
What Is a Cable Window Restrictor? How They Work A cable window restrictor is a simple mechanical device fitted to a window to limit how far it can open. I...
Cable Window Restrictor Safety Features Explained
Cable Window Restrictor Safety Features Explained What a cable window restrictor does and where it is used A cable window restrictor is a safety device fit...