How to Remove a Cable Window Restrictor Safely
How to Remove a Cable Window Restrictor Safely Removing a cable window restrictor can be straightforward for a competent DIYer or trade professional, but i...
How to Remove a Cable Window Restrictor Safely
Removing a cable window restrictor can be straightforward for a competent DIYer or trade professional, but it must be done with care. This post explains when removal is appropriate, the tools and materials required, step-by-step procedures for common fixings, and safety and regulatory points to consider for UPVC, timber and aluminium windows.
When you should remove a cable window restrictor
Before starting, confirm why the restrictor needs removal: replacement with a new restrictor, upgrading to a quick-release device, repair after corrosion, or preparing for a full window sash replacement. Do not remove a restrictor if it forms part of a fire escape route or a tenancy safety requirement without alternative measures in place. If in doubt; consult the property owner, building manager or a qualified installer.
Tools and materials
- Screwdriver set: Pozidriv, crosshead and flat blades; Torx and hex keys as required
- Electric drill with a set of metal and masonry bits
- Rivet drill bit or pop rivet tool if the restrictor is riveted
- Cable cutters or a junior hacksaw for thick stainless steel cable
- Pliers: long-nose and adjustable
- Centre punch and hammer (for drilling rivets)
- Marker and tape to protect paintwork
- Replacement fixings, filler and touch-up paint, or blanking plates
- Personal protective equipment: safety glasses, gloves, dust mask
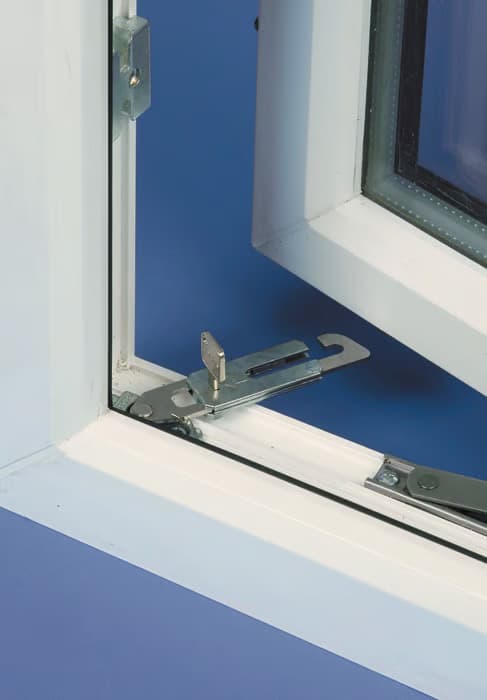
Identify the type of cable window restrictor
Cable window restrictors come in several styles: screwed plates, riveted anchors, keyed or quick-release locks and internal sash-mounted plates. Locate the two attachment points: one on the fixed frame and one on the opening sash. Note whether screws are visible, covered by caps, or if pop rivets are used. Some restrictors use a swaged ferrule at the cable end which can be cut away; others use a loop secured with a crimped sleeve.
Step-by-step removal: standard screwed units
These are the most straightforward to remove.
- Open the window to a comfortable working position and support the sash to prevent it moving while you work. For large sashes ask an assistant to help.
- Protect the frame and glass with masking tape where you will rest tools.
- Remove any decorative screw caps with a small flat blade.
- Use the correct screwdriver for the head to avoid stripping the screw. Hold the driver square to the screw; apply firm, steady pressure and turn anticlockwise until free.
- If a screw is seized, apply penetrating oil; allow a few minutes to soak in. Use a screwdriver with a longer shaft or a higher torque driver if needed; use care not to cam out and damage the frame.
- Once screws are out, separate the plates and gently feed the cable out of the sash plate. If the cable has a crimped ferrule, remove the ferrule with cable cutters or snip the cable close to the ferrule and extract the remainder through the hole.
Step-by-step removal: riveted or pop rivet anchors
Riveted fixings are common on metal and UPVC frames and require drilling.
- Mark the centre of the rivet head with a centre punch to stop the drill wandering.
- Start with a small pilot drill then switch to a bit the diameter of the rivet mandrel; drill through the head until it breaks free. Keep the drill square to the surface.
- Once the head is removed, use pliers to pull out the remaining shank and free the plate.
- Be prepared to dress any rough edges with a file and to fill and redecorate any cosmetic damage to the frame.
Step-by-step removal: cutting the cable safely
If access to the anchorage is limited, cutting the cable may be quicker. Follow these points:
- Clamp the sash or have an assistant hold it open; the cable can recoil or whip when cut.
- Fit suitable safety goggles and gloves. Position the cable so any spring tension is released in a controlled direction away from glass and bystanders.
- Use cable cutters for thin stainless cable; use a hacksaw or bolt cutters for thicker varieties. Cut close to the ferrule to leave minimal protrusion.
- Remove the cut end and then remove the plates as described for screwed or riveted fixings.
After removal: inspection, replacement and finishing
Once the restrictor is removed, inspect fixings and frame for damage, corrosion or deformation. If the restrictor is being replaced:
- Fit a new unit that matches the original load rating and type; for childcare settings or vulnerable occupants consider a quick-release device certified for emergency egress.
- Use the correct fixings: self-tapping screws into UPVC reinforcement should be the same diameter and length as original; aluminium commonly uses pop rivets sized appropriately.
- Where holes remain unused, fit blanking plates or fill with an appropriate filler and touch-up paint to prevent water ingress and maintain aesthetics.
Trade tips and practical advice
- Use magnetic bits or screw holders to avoid dropping screws into frames.
- For seized screws use an impact driver to free them without stripping the head.
- When drilling rivets, hold a magnet or small container beneath to catch debris and prevent it falling into frame cavities.
- Label removed parts and store them if the restrictor will be refitted; this helps with matching replacement parts later.
- If the cable is corroded on a coastal property, replace both anchor points and the cable; salt causes rapid failure.
Health and safety considerations
Always wear eye protection when drilling or cutting steel. Be mindful of loads: some restrictors are rated and help prevent falls; removing them removes that protection. Do not remove a restrictor where it is specified as a safety device for a child or a tenancy obligation without implementing an alternative. If removal affects fire escape, exit or compliance with building regulations, consult a qualified professional.
Recommended Products
Based on this article, you may find these products helpful:
- UAP Keyless Window Restrictor
- TSS Keyless Cable Window Restrictor
- TSS Fixed Cable Window Restrictor
- RES Lock Concealed Window Restricto
Conclusion and next steps
Removing a cable window restrictor safely requires the right tools, a clear understanding of the fixing method and awareness of safety and regulatory issues. For simple screwed and riveted units a competent DIYer can undertake the task; for systems integral to fire safety or where frame damage is likely, use a trade installer. For further information on related locks and restrictors visit our pillar page at /c/windows-restrictors. If you need replacement hardware or advice about compliant quick-release devices, contact a local trade supplier or call our technical team for specification help.
Related articles
Window Restrictors
What Is a Cable Window Restrictor? How They Work
What Is a Cable Window Restrictor? How They Work A cable window restrictor is a simple mechanical device fitted to a window to limit how far it can open. I...
Cable Window Restrictor Safety Features Explained
Cable Window Restrictor Safety Features Explained What a cable window restrictor does and where it is used A cable window restrictor is a safety device fit...